Monday, August 27, 2018

The Last Five Years - HOUSE TOUR!

Last week marked the first day of yet another school year of teaching for Eric, it also marked the anniversary of when we moved into our house...FIVE YEARS AGO! Seems like yesterday though. Packing, hauling boxes, cleaning everything, countless trips back and forth from our tiny two-bedroom apartment to this "new"100-year-old house. Our Incredible family and friends helped the entire day, and I'll never forget the overwhelming sensation of looking around and seeing all of our possessions, and...well...crap, just thrown everywhere. For someone who thrives on organization, it still gives me a twinge of anxiety just thinking about it. 

But that crap was thrown everywhere in OUR house! WE bought a house! WE were homeowners and so beyond excited to start that next adventure. 

Five years later and I am still filled with absolute joy by simply walking from room to room. There has been so much love brought into this space, and it truly has transformed from just a house to our home. Click the links to check out how the house looked when we first moved in, as well as our one-year house tour

But today we're talking FIVE YEARS. So let's take a little trip down memory lane, shall we? I've gathered up pictures from when we first moved in and set up a little before-and-after with pics from this morning. 

Cue "Let's See How Far We've Come" by Matchbox Twenty! 
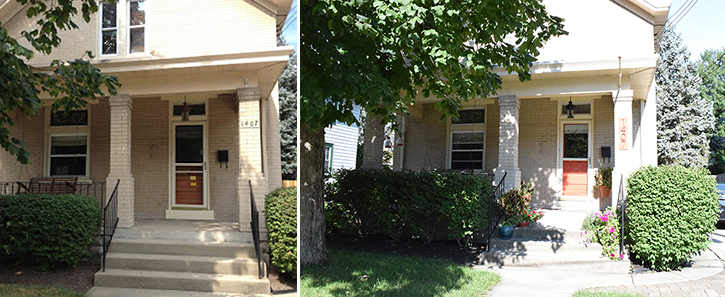
The biggest updates we made to the general exterior of the house are painting the front door, upgrading the address numbers, painting the light black, and getting a new roof. Filling the porch with potted flowers is one of my favorite things to do in the Summer. I can't get enough of how their color just spills down the steps. Unfortunately this year one of our big terracotta pots took a tumble, oh well, it's almost time for mums anyway.

Once you enter through the threshold, you'll find yourself in our charming little foyer. 
What was once dark and muddy is now bursting with color and personality! We painted the walls, trim, added a landing spot for keys and such, and even installed a funky yellow light

Moving through to the kitchen, we painted over yet another shade of brown and breathed fresh new life into the cabinets. 
The order of transformation for the kitchen went as follows; painting the cabinets, painting the walls, hanging some DIY curtains, and giving the fan a mini upgrade. We also swapped the microwave stand for some metal Ikea shelves, and glammed up the mini awkward bathroom. Future plans still include new appliances, cabinet hardware, and replacing the floors. 

Off of the kitchen is our dining room. 
This was one of the first rooms that really felt "complete". Of course, nothing is truly finished, and although we hardly ever actually dine in here it's still one of my favorite spaces. Because it gets the most sunlight, a majority of the plant babies live in here. Painting the ceiling had a major impact on how this room felt, and I love the addition of Eric's guitar and ukulele on the wall. We still want to paint the chairs white (you can see one in the background of the first pic) and reupholster the cushions. I've also been keeping my eye out for a sweet lighting option...but we'll see. 

The only room left on the first floor is the living room! 
I could NOT paint over that olive green fast enough. And painting all the trim white was one of the best decisions we ever made. Notable things I adore include the big-kid furniture we gifted ourselves one Christmas, Eric's old nesting tables I gave a facelift, that colorful shag rug, and thrifted sconces I scored for practically nothing. That coffee table also wins best purchase for under $90. 

Our floor plan is basically a circle, so once you've mozied through the living room you'll find yourself back in the foyer face to face with our gallery wall. 
Walking into your home should fill you with all of the feels, and that is how I react every time I come home from work and look at all of our pictures, knickknacks, and random elephants. That gallery wall is a reflection of our life, and watching it grow through these years has been way too much fun. 

So let's head upstairs! 
Right from day one, I knew I wanted a black and white banister. If you looked closely at the spindles, there was so much brown paint on them you could barely make out the curvature details and the handrail was anything but sexy. They needed some serious love, and we were ready for the job. And OMG what a job it was. The whole project took a lot of time, repetition, and yet again Eric showing off how incredible he is. He also tore off the brown carpet (are we sensing a color theme??) and replaced it with a beautiful geometric grey runner.

One of the reasons we bought this house is because it actually had a full second story. We were shown a lot of "cape cod" style homes where the second floor is one big room with slanted ceilings on both sides. Not so great when your husband is 6'8''. 
More brown walls, more brown trim, more brown doors. UUUGGG! PAINT PAINT PAINT! 
Oh, and replace the light with a lil something super cute. 

To the left, you'll find the master bedroom. 
We chose to paint the walls the same grey as the living room, and once the doors and trim were painted white everything really brightened up. The ceiling fan and headboard were recent additions, and our bed frame was build custom by Eric's grandpa. I also created a jewelry organizing out of an old mattress spring frame from a baby crib. Someday I'd like to get a rug, or at least two smaller rugs for each side of the bed, and hang a few more things on the walls. For now, I'm very pleased with the cozy state of our bedroom. 

At the end of the hall is our bathroom, or mermaid room as I've dubbed it. 
This room was pretty boring (tan, brown, darker brown) but I think the end result is just lovely. I actually did this makeover 98% by myself, so go me! 

Turning back down the hallway you'll find our two spare bedrooms. One of which we knew would need to be made for overnight guests. 
When deciding how to design this room, I knew I wanted to hide the sloping ceiling. That is why the color only goes halfway up the wall, not only is it bold (which I love) but it serves a legit purpose. Next steps for the guest room include an updated ceiling fan, more storage for guests to put their things, and more art on the walls. 

Last but not least we have our office space. 
Our office has been the most recent room we've worked on. Again, to hide the sloped ceiling we painted everything white except the one full wall. And I tell you what. That beautiful emerald GIVES ME LIFE! It's almost comparable to the high I get while styling those shelves. Having space to actually work and be productive at home has absolutely been a game changer. Plus sometimes I'm doing freelance, and Eric's working on school stuff, and we're like on a little computer date and IT'S SO CUTE! 

Ok, enough pictures from the inside, let's go out back! 
If you've read my blog for a while, you'll remember our GIANT backyard makeover we completed last summer. It literally was a couple years worth of work, but DANG was it worth it. The whole thing started with Eric and his dad building the pergola. Then the project took a little bit of a stand-still for a while, before really taking off when we got the concrete poured and the flower beds built. My favorite thing out here though is hands down the custom table Eric built and I painted.

Writing this post was an absolute blast. I had forgotten what each space looked like when we first moved in, and the change is incredible! I do find it funny how some areas have been completely revamped, and other little decorations and things haven't moved since I placed them down five years ago. 

I feel the winds of change a blowing though. Maybe it's about time we consider crafting up another crazy DIY in the near future. Hmmmm...


Check out all of our home improvements, by visiting the OUR NEST page.

Sunday, April 22, 2018

Instagram Story Recipes

I love to cook. Always have, always will. Probably because I love to eat, and the two hobbies tend to go hand-in-hand. And while I truly enjoy every minute spent in the kitchen, 90% of the time it's not until 7pm or later before I finally get home to start dinner. So when it comes food, I like my recipes how I like my gossip; quick, to the point, and maybe a little spicy. 
Lately, I've been highlighting some of my favorite dinner ideas on Instagram. (If you missed any, give me a follow and check out my story highlights!) I didn't think too much of it until people started continuously asking for the recipes, and commenting how much they enjoyed watching me make food. Then when another friend added, "You know, you should just write a blog post." well, it doesn't get any clearer than that. 

So let's DIG IN! Below are SIX of the past dinners enjoyed at the Wellman household and links to the original recipes. Give them a try, let me know what you think, and if you have any go-to favorites you want to share I'm all ears! 
What you need: 
6 cups chicken broth
2/3 cup uncooked orzo
1 cup shredded carrots 
1 1/2 cups uncooked asparagus, snapped to bite size pieces 
1 cups frozen broccoli 
4 medium scallions, cut into small pieces
1/3 cup fresh dill, chopped 
2 tbs lemon juice
Salt and pepper to taste 

What to do: 
1. Bring broth to a boil in a large saucepan over high heat. 
2. Add orzo and carrots; boil 7 minutes.
3. Add asparagus and frozen broccoli; boil until orzo and vegetables are tender, about 3 minutes.
4. Remove from heat, stir in scallions, dill, lemon juice, salt, and pepper. 

What you need: 
2 golden delicious apples, cored and diced
2 kiwi, peeled and diced
2  8 oz raspberries, roughly chopped or smashed 
1  16 oz strawberries, diced 
2-3 tbs fruit preserves, any flavor 
Dash of brown sugar 

What to do: 
Chop, dice, and slice your fruits. In a large bowl, thoroughly mix kiwis, apples, raspberries, strawberries, and fruit preserves. If you think it needs a little more sweetness, sprinkle brown sugar in and mix well. I think it's served best with cinnamon and sugar pita chips! 

What you need: 
2 sweet potatoes, chopped
3 tbs olive oil, divided
1 cup bell peppers, chopped
1 cup uncooked rice
1 can (14.5 oz) petite diced tomatoes
1 can (15 oz) black beans, rinsed and drained
1 cup frozen corn
1/2 tsp minced garlic
1/2 tsp chili powder 
1 tsp cumin
2 cups vegetable or chicken broth
2 tbs lime juice (optional)
Optional toppings: shredded cheese, avocado, sour cream, scallions

What to do: 
1. In a large skillet over med-high heat, combine 2 tbs olive oil with all the sweet potatoes, and saute for about 6-8 minutes until tender. 
2. Add remaining oil, peppers, and rice. 
3. Cook, stirring constantly for 2-3 minutes. Then add tomatoes, black beans, corn, garlic, chili powder, cumin, and broth. Give everything a good stir, bring to a boil. 
4. Reduce heat, cover, and let simmer for 10-15 min, or until the liquid is absorbed and rice is cooked. 
5. Remove from heat, stir in lime juice, top with cheese so it gets nice and melty. Top with whatever you want and enjoy! 

What you need: 
1 lb boneless skinless chicken breasts, diced into 1-inch cubes
3/4 cup chopped yellow onion 
1 tbs olive oil 
2 cloves garlic, minced
salt and pepper 
1 3/4 cup chicken broth 
1 cup dry quinoa
1/4 tsp dry thyme
2 1/2 cups chopped broccoli florets 
1 cup shredded sharp cheddar 

What to do: 
1. Heat olive oil in a deep skillet over med-high heat. Once hot, add onion and saute 2 minutes. 
2. Add chicken and cook 2 1/2 min stirring occasionally.
3. Add garlic and saute 1 min longer. 
4. Add broth, quinoa, and thyme and season with salt and pepper. 
5. Bring to a full boil then cover, reduce heat to a simmer and cook 12 min. 
6. Lift the lid, sprinkle broccoli over top, recover and simmer about 8 min longer until quinoa and broccoli have cooked through. 
7. Sprinkle cheese over top, cover and let melt 1-2 minutes. 

What you need: 
3 tbs olive oil
3 cups yellow onions, chopped
1 tbs minced garlic
4 cups chicken stock
1 28 oz can crushed tomatoes
Large pinch of saffron
Salt and pepper 
1/2 cup uncooked orzo
1/2 cup heavy cream 

What to do: 
1. In a large pot or dutch oven heat the olive oil over medium heat. 
2. Add onions and cook for 15 minutes, stirring occasionally, until golden brown. 
3. Add garlic and cook for 1 more minute. 
4. Stir in chicken stock, orzo, tomatoes, saffron, 1 tbs salt and 1 tsp pepper. 
5. Bring to boil then lower heat and simmer for 15 minutes. 
6. Stir in the cream, and let soup continue to simmer for 10 more minutes, stirring frequently, until the pasta is cooked. 

What you need: 
6 red, orange, or yellow bell peppers 
2 cans of chicken chunks in water (or 2 cooked chicken breasts) 
1 1/2 cups mozzarella cheese, shredded and divided 
1 cup cooked quinoa
1 6.25 oz jar of pesto 

What to do: 
1. Turn on broiler to high. Place bell peppers under broiler and broil for 5 minutes on each side until skin blisters and begins to turn black. (This step is completely optional. Just a lil something extra!) 
2. Remove peppers from oven, set aside. Preheat oven to 350. 
3. In a medium-size mixing bowl combine chicken, 1 cup of cheese, pesto and quinoa. Toss to coat. 
4. Once peppers are cool enough to handle, cut in half and remove insides and seeds. Add 1/4 cup of chicken mixture to each pepper and top with cheese. 
5. Bake 10 minutes, then serve. 

There's something about taking simple ingredients and creating a delicious and comforting meal that I adore. I'm not a brilliant chef, nor do I make anything mind-blowing, but I can follow a recipe and have been known to whip up some pretty great dinners with whatever happens to be on hand. 

So stay tuned! I'm sure they'll be even more mouth-watering recipes to share in the near future. 


Still hungry? There's more to dig into on the FOOD - RECIPES page.


Friday, March 23, 2018

A Different Kind of March Madness Bracket

My husband is amazing. At this very moment he's downstairs praying to the March Madness Gods that Purdue will pull off another victory, and his bracket won't be completely destroyed. I on the other hand am here, typing away, and praying to Mama Nature that the storm predicted to hit tonight won't actually be the "Springtime Snowpocalypse" it's hyped up to be. And although he TOLD me to write how amazing he is, it's not a lie. He is pretty fantastic. Keeping with the current basketball theme, his most recent endeavour for brownie points also occurred in the form of a bracket...or six. 

In the previous post about our new (to me) home office, we finally set up our workspace and threw a brand spanking new rug on the floor. Bit by bit this room is coming together, and over the weekend we were able to cross yet another EXCITING organizational detail off the list.
MORE PLACES TO PUT ALL THE THINGS! 

The gloriously emerald wall above our computers, although a stunner, was still very blank. And since I couldn't commit to hanging giant art, I figured the next best thing would be a setup where I could swap out the knick-knacks for whatever I want, whenever I want.
Honestly, it wasn't even "over the weekend". This literally took one day. I think we finished so fast because Menards was rocking their 11% rebate sale, and that never fails to lure my husband in like a mythological temptress. Speaking of sirens, we swung by Starbucks after and I tried their new Blond Espresso, pretty tasty! 
To keep things simple we used these prefinished boards, that way no painting was required....or so I thought. When I started to look at everything together, I didn't want the green wall to be broken up by the white. Solution? Paint the edges of the shelves the same color! 
We staggered the height for variation and marked all the studs to be sure the brackets (we opted for these) were as secure as possible. Our walls did provide a few surprises during this process, apparently the studs aren't all equally spaced, and forget about them being completely even. #oldhomelove
This is where Eric dubbed them "his and her" shelves. Since the bottom one ended up exactly at my eye-level, we of course hung the top one at his. Which would be super adorable...except every time I set something up there, Eric's response is "Why is your stuff on MY SHELF!". Honey. Stawp. 

Next was the fun part, STYLING!!!!  
I've been meaning to get that "Periodic Table of Typefaces" poster framed for almost five years. Not super proud of that, but hey, better late than never. This would be the perfect time for an element joke, but all of the good ones argon

Hehe.

It'll take a little time and curating (helloooo giant gap stage right) to get everything looking just perfect, but I consider that half the fun. 

Although it may seem like we're constantly working on our home, there are typically huge gaps of time between projects. After so long, I can't take it anymore, and  I get this CRAZY urge to do home improvement. 

This absolutely satisfied my craving.


Check out all of our home improvements, by visiting the OUR NEST page.


Saturday, February 10, 2018

A Green Wall and a Gorgeous Rug

Currently it is Saturday. I'm sitting at my desk sipping a mimosa, and while it isn't quite 5:00, it will be when I'm done writing this post so I'm counting it as an acceptable drinking time.

Confession, this is my second mimosa, but I'm an adult and really just wanted an excuse to use my fancy YETI wine-glass thing. Plus the champagne was already open so why go through the whole "get the cork-screw out" ordeal when pouring a glass of prosecco was WAY easier! 

I digress. The detail I actually want you to focus on in the above rant is this; I'M SITTING AT MY DESK. 

That's right. Who has two thumbs and finally her own space to work at home from? THIS GIRL! WOOP! 

Listen, it has been a JOURNEY. Since move-in day, we always considered the 3rd room upstairs as "the office". Although for the longest time 90% of it's use was for storage. 
Not so pretty. 
But with time, and some general organization, it served its purpose and overall wasn't "that bad" of a space. 
Until I just couldn't take it anymore. 

Every once in a while, in those rare moments of us having no set plans or commitments, Eric will turn to me and ask "So what would you like to get done this weekend?" and that's when I pounce. 

Clear it out, clean it up, and for the love of God get rid of that horrible brown/tan/EW paint color. 

So we did! 
This room has the same sloped ceiling as our guest bedroom, so I wanted to keep your eye away from the shorter wall, and create the sense of unity between the two sides. While painting only halfway up the walls helped in the guest bedroom, I didn't want to use the same method in here. The solution? Keep everything white, except for the one full-sized wall. 
Emerald like my favorite city, Judy Garland would be proud. Did you know she died of a drug overdoes? (_)<<

Paint? Check. Up next? A place to work. 
Now call me a hopeless romantic, but I always envisioned Eric and I being able to type side by side at our own matching desks. Like brushing your teeth at his-and-her bathroom sinks, only nerdier. So one night we went out to a romantic dinner at our favorite little spot, ate Swedish meatballs, and picked out office furniture. 

IKEA. We ate dinner at IKEA. 

2 Linnmon Table Tops + 2 Lerberg Trestles + 2 Klimpen Drawer Units (similar, ours our white) = custom desks that fit PERFECTLY against our new green wall. 

Of course we couldn't settle for the boring drawer pulls, and promptly swapped them out for something with a bit more style.
This makes me want to DO ALL THE THINGS! Be productive, file papers, organize our books, make labels, EVERYTHING! But like any project under the Wellman roof, nothing is 100% complete. I have big dreams of beautiful shelves above and stylish reading lights on either side of the computers. Maybe a floor lamp too! 
I DO need a place to sit though. Even our adorableness reaches its limit at "sharing the same desk chair". Well if I don't get a chair, I can at least sprawl out on the floor with our new rug! 
Isn't she gorgeous!? Rugs USA wins again. 

This room is embracing 2018 head-on. It took a while, but things are finally starting to make sense. Gone are the days of closing the door and ignoring the complete chaos behind it, instead it feels like I've gained an entirely new area of the house! With my big-girl computer, I actually USE the office. I look forward to taking on extra freelance projects because I have SOMEWHERE TO WORK ON THEM!!! 
Life changing. Truly the perfect way to kick off a new year. 


Check out all of our home improvements, by visiting the OUR NEST page.