Showing posts with label Bedroom. Show all posts

Sunday, September 17, 2023

When Your Favorite Colors Are Yellow and Rainbows, You Will Never Wake Up Sad

 Hello again my lovelies! 

Well, we did it. We blinked and another Summer break has come and gone. Although the weather hasn't quite gotten the memo yet, pretty soon the air will become crisp and the leaves will turn those gorgeous shades of red and yellow that absolutely light my soul each season. 

Another person who is looking forward to the leaves turning yellow is the smaller man of the house; Mr. Harrison. Since the day he could declare it, yellow has been his favorite color. Literally, any time something yellow passes his gaze, he immediately lights up and shouts "Hey! Yellow! That's my favorite color!" 

So when "finishing Harrison's room" made it to the top of our Summer to-do list, you can guess what was on the tip of his tongue when we began discussing paint colors. Not only was yellow his main request, but he also wanted rainbows. 

Yellow and rainbows. 

Rainbows and yellow.  

Now. I'd like to say I'm one of those moms who put their child's happiness first and foremost, but a direction of "Yellow and Rainbows" was going to test me. Even though I had my doubts about how reasonable an artistic collaboration with a four-year-old would be, I was determined to find a design solution we were both happy with.

And while we did weather the storm on a few occasions (see the disappointing "dot wall") as they say, without rain, there would be no rainbows. 🌈

Harrison's room makeover was way overdue. It's been almost three years that we've lived in this house, and besides some basic decorating and upgrading his crib to a twin bed, no major progress has been made. 

So we started from scratch. 

He knew he wanted yellow, and while my gut wasn't completely on board with an entire yellow room, something I could see working (and truthfully got me SUPER excited) was a yellow ceiling.  

We landed on Honey Locust by Behr, which gave the sense of a true yellow, but not SO yellow that screamed creepy smiley faces or fast food restaurants. The rest of the walls were given a fresh coat of white, which really let the ceiling be the shining star. 

Like the rest of the rooms in our house, as we painted we also replaced all of the thin wooden trim with something taller, white, and more colonial. Replacing trim is something Eric has become kind of a pro at, so while we were going to be doing the work for Harrison's room, he figured it just made sense to stay in the world of trim and knock out the entire upstairs hallway at the same time. 

Of course, this meant I had to VERY quickly choose a wall color. Lucky for me, there were a few shades I was still in love with from when we decided to paint our dining room. Diverse Beige by Sherwin Williams jumped to the front of my mind as the perfect in-between/pull-all-the-colors-together hallway choice. I also knew I'd like it because it was what we painted the bench and cubbies in our mudroom. 

I don't think I ever shared photos from when we initially painted all of the upstairs doors white, so please enjoy this epic before and after featuring some thick and glorious trim transformation!
While Eric conquered the hallway, it was up to the kids and me to take on the accents. First up, giving Harrison a yellow bed. 

Was it the most straightforward process handing my two small children a brush and a roller, hoping for the best? No. Did they actually get the job done? Also no. But they did do about 80% of it and Harrison was totally up for the task. I'd call it a win. 
The second accent I wanted to focus on was a "fun wall". Something to satisfy the desire for rainbows while maybe not actually having a million small arches all over his room. I scoured the web for inspiration and landed on a terrazzo pattern in a muted pallette that was close to a rainbow while also not being too feminine. The process was simple enough and I completed the whole thing in a matter of hours. 
The end result was adorable on so many levels, but when I revealed to Harrison his new wall, he was...unenthused to say the least.👎 

They say the client is always right, and my client wanted rainbows. But my client is also four, and I'm his mom, and I did not want an entire room filled with rainbows like overdone boho wallpaper. 

So we came to an agreement; one big rainbow. 

To achieve this I simply chose my location and marked the widest points on the left and right as well as the tallest point. Then using chalk I freehanded my first arch, taking a step back to check my work every once in a while to confirm I liked the shape I was creating. Once satisfied, I measured 8 inches below, and using my first arch as a guide made a bunch of dashes on the wall to tell me where to draw my second arch. After repeating that process six more times I had my rainbow.

Taping everything off seemed insanely tedious, so I just went nice and slow while using an angled brush. 
I wish I had a video of Harrison's reaction after seeing just the chalk outline, he was STOKED. The kid knew what he wanted, and he wanted a legit rainbow. 

It took us a bit longer than expected, but we finally hung up his art, signs, and shelves which brought this update to an official close. I'd love to bring in more of the rainbow colors as well as additional pops of yellow here and there. Just like Harrison, this room will continue to grow as time passes. 
Anyone who's followed this blog through the years knows I have strong opinions about how I want my space to look. Design matters to me. It brings me joy, and I want it to touch all areas of our home including the rooms of our kids. Finding that balance of applying what they're currently obsessed with but in a beautiful way, is a challenge I'm more than happy to take on. 

As for my yellow and rainbow-obsessed child, I'm aware it's unrealistic to think Harrison's tastes are going to stay the same for a long period of time. Tomorrow he could declare that he doesn't like yellow or rainbows and he wants a new room with robots and superheroes. 

And if that happens, I'll look into that adorable little boy's bright blue eyes, give him a big hug and say; "Well, that's too damn darn bad. Now go play in your yellow room." 


Check out all of our home improvements, by visiting the OUR NEST page.


Monday, January 24, 2022

After Christmas Trimming

Anyone else make a huge "Christmas Break To-Do" list? All of those things you've been putting off pre-holidays, hoping you'll find time to be productive after the reindeer stampede passes and the tinsel settles?
We sure did, and boy was it over ambitious. HA! 
After finishing Eleanor's Nursery, we hadn't made any additional progress on our goal of replacing the trim throughout the house. So we decided THAT would be our project; update the trim in our bedroom, the toy room, and maybe get started on the dining room. 

Once we returned home from the holidays (with a week until either of us went back to work) we cleared our schedules, sent the kids to daycare for a few days, and got down to business! 
Fast forward to Friday, and we found ourselves about 85% complete...with one room...and that's it. 

Overall, I was still pretty impressed by how much we got done with only two kid-less days. Was it everything we set out to accomplish? No. Did we still feel pretty great since most of the time was spent juggling a caulking gun in one hand and an 11-month-old in the other? You betcha. 

The entire process went decently smooth too. We used a crowbar to pry off the old trim, picked up all of the new from Home Depot, prepped, painted, then cut each piece down to size. Mr. Harrison even got to help. 
Eric used his swanky new nail gun hooked up to the air compressor to make quick work of tacking the pieces into place. Then my job was to follow with putty filling in the nail holes and sweeping...lots and lots of sweeping. 
Next, we sanded, caulked around everything to fill the gaps, and lastly touched up any white or purple paint that needed love. We used caulk in Eleanor's room too, it created a nice seamless finish, so we wanted to do the same here. 
I'm obsessed with the high contrast between the dark walls and the white trim, plus the thicker size and colonial detail around the doors brings in so much extra character. 

It's taken a little over a year, but this room is finally shaping up! For some reason our home improvement and decorating pace has slowed the more offspring we add. Figures. 
The last big update I'd like to make in this space is painting all the doors. I'm toying with the idea of black for the interiors, and then white for the closets and bathroom. Or maybe just white for everything, I haven't quite made up my mind yet. 

How our room is coming together brings me so much joy. The dark and moody Plum Brown color is such a change from anything we've done in the past. I can't wait to bring in more art, plants, some furniture, and soon hang two more curtains on those bare windows. Of course, that will just give Harrison another prime hiding spot for his new favorite game; hide-and-go-seek. 

Your bedroom should give you all the good feels, and considering every time I walk into ours I look at the trim and do a little happy dance, I'd say we're succeeding. 


Check out all of our home improvements, by visiting the OUR NEST page.


Monday, August 27, 2018

The Last Five Years - HOUSE TOUR!

Last week marked the first day of yet another school year of teaching for Eric, it also marked the anniversary of when we moved into our house...FIVE YEARS AGO! Seems like yesterday though. Packing, hauling boxes, cleaning everything, countless trips back and forth from our tiny two-bedroom apartment to this "new"100-year-old house. Our Incredible family and friends helped the entire day, and I'll never forget the overwhelming sensation of looking around and seeing all of our possessions, and...well...crap, just thrown everywhere. For someone who thrives on organization, it still gives me a twinge of anxiety just thinking about it. 

But that crap was thrown everywhere in OUR house! WE bought a house! WE were homeowners and so beyond excited to start that next adventure. 

Five years later and I am still filled with absolute joy by simply walking from room to room. There has been so much love brought into this space, and it truly has transformed from just a house to our home. Click the links to check out how the house looked when we first moved in, as well as our one-year house tour. 

But today we're talking FIVE YEARS. So let's take a little trip down memory lane, shall we? I've gathered up pictures from when we first moved in and set up a little before-and-after with pics from this morning. 

Cue "Let's See How Far We've Come" by Matchbox Twenty! 
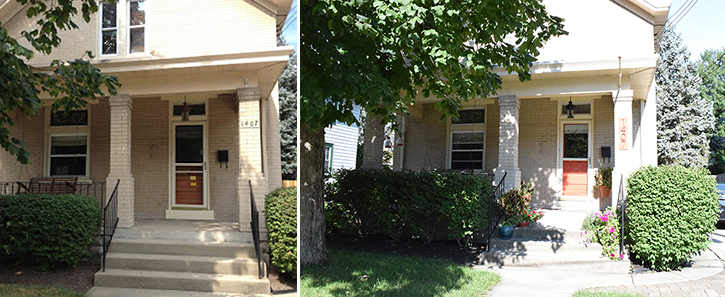
The biggest updates we made to the general exterior of the house are painting the front door, upgrading the address numbers, painting the light black, and getting a new roof. Filling the porch with potted flowers is one of my favorite things to do in the Summer. I can't get enough of how their color just spills down the steps. Unfortunately this year one of our big terracotta pots took a tumble, oh well, it's almost time for mums anyway.

Once you enter through the threshold, you'll find yourself in our charming little foyer. 
What was once dark and muddy is now bursting with color and personality! We painted the walls, trim, added a landing spot for keys and such, and even installed a funky yellow light. 

Moving through to the kitchen, we painted over yet another shade of brown and breathed fresh new life into the cabinets. 
The order of transformation for the kitchen went as follows; painting the cabinets, painting the walls, hanging some DIY curtains, and giving the fan a mini upgrade. We also swapped the microwave stand for some metal Ikea shelves, and glammed up the mini awkward bathroom. Future plans still include new appliances, cabinet hardware, and replacing the floors. 

Off of the kitchen is our dining room. 
This was one of the first rooms that really felt "complete". Of course, nothing is truly finished, and although we hardly ever actually dine in here it's still one of my favorite spaces. Because it gets the most sunlight, a majority of the plant babies live in here. Painting the ceiling had a major impact on how this room felt, and I love the addition of Eric's guitar and ukulele on the wall. We still want to paint the chairs white (you can see one in the background of the first pic) and reupholster the cushions. I've also been keeping my eye out for a sweet lighting option...but we'll see. 

The only room left on the first floor is the living room! 
I could NOT paint over that olive green fast enough. And painting all the trim white was one of the best decisions we ever made. Notable things I adore include the big-kid furniture we gifted ourselves one Christmas, Eric's old nesting tables I gave a facelift, that colorful shag rug, and thrifted sconces I scored for practically nothing. That coffee table also wins best purchase for under $90. 

Our floor plan is basically a circle, so once you've mozied through the living room you'll find yourself back in the foyer face to face with our gallery wall. 
Walking into your home should fill you with all of the feels, and that is how I react every time I come home from work and look at all of our pictures, knickknacks, and random elephants. That gallery wall is a reflection of our life, and watching it grow through these years has been way too much fun. 

So let's head upstairs! 
Right from day one, I knew I wanted a black and white banister. If you looked closely at the spindles, there was so much brown paint on them you could barely make out the curvature details and the handrail was anything but sexy. They needed some serious love, and we were ready for the job. And OMG what a job it was. The whole project took a lot of time, repetition, and yet again Eric showing off how incredible he is. He also tore off the brown carpet (are we sensing a color theme??) and replaced it with a beautiful geometric grey runner.

One of the reasons we bought this house is because it actually had a full second story. We were shown a lot of "cape cod" style homes where the second floor is one big room with slanted ceilings on both sides. Not so great when your husband is 6'8''. 
More brown walls, more brown trim, more brown doors. UUUGGG! PAINT PAINT PAINT! 
Oh, and replace the light with a lil something super cute. 

To the left, you'll find the master bedroom. 
We chose to paint the walls the same grey as the living room, and once the doors and trim were painted white everything really brightened up. The ceiling fan and headboard were recent additions, and our bed frame was build custom by Eric's grandpa. I also created a jewelry organizing out of an old mattress spring frame from a baby crib. Someday I'd like to get a rug, or at least two smaller rugs for each side of the bed, and hang a few more things on the walls. For now, I'm very pleased with the cozy state of our bedroom. 

At the end of the hall is our bathroom, or mermaid room as I've dubbed it. 
This room was pretty boring (tan, brown, darker brown) but I think the end result is just lovely. I actually did this makeover 98% by myself, so go me! 

Turning back down the hallway you'll find our two spare bedrooms. One of which we knew would need to be made for overnight guests. 
When deciding how to design this room, I knew I wanted to hide the sloping ceiling. That is why the color only goes halfway up the wall, not only is it bold (which I love) but it serves a legit purpose. Next steps for the guest room include an updated ceiling fan, more storage for guests to put their things, and more art on the walls. 

Last but not least we have our office space. 
Our office has been the most recent room we've worked on. Again, to hide the sloped ceiling we painted everything white except the one full wall. And I tell you what. That beautiful emerald GIVES ME LIFE! It's almost comparable to the high I get while styling those shelves. Having space to actually work and be productive at home has absolutely been a game changer. Plus sometimes I'm doing freelance, and Eric's working on school stuff, and we're like on a little computer date and IT'S SO CUTE! 

Ok, enough pictures from the inside, let's go out back! 
If you've read my blog for a while, you'll remember our GIANT backyard makeover we completed last summer. It literally was a couple years worth of work, but DANG was it worth it. The whole thing started with Eric and his dad building the pergola. Then the project took a little bit of a stand-still for a while, before really taking off when we got the concrete poured and the flower beds built. My favorite thing out here though is hands down the custom table Eric built and I painted.

Writing this post was an absolute blast. I had forgotten what each space looked like when we first moved in, and the change is incredible! I do find it funny how some areas have been completely revamped, and other little decorations and things haven't moved since I placed them down five years ago. 

I feel the winds of change a blowing though. Maybe it's about time we consider crafting up another crazy DIY in the near future. Hmmmm...


Check out all of our home improvements, by visiting the OUR NEST page.