
But that crap was thrown everywhere in OUR house! WE bought a house! WE were homeowners and so beyond excited to start that next adventure.
Five years later and I am still filled with absolute joy by simply walking from room to room. There has been so much love brought into this space, and it truly has transformed from just a house to our home. Click the links to check out how the house looked when we first moved in, as well as our one-year house tour.
But today we're talking FIVE YEARS. So let's take a little trip down memory lane, shall we? I've gathered up pictures from when we first moved in and set up a little before-and-after with pics from this morning.
Cue "Let's See How Far We've Come" by Matchbox Twenty!
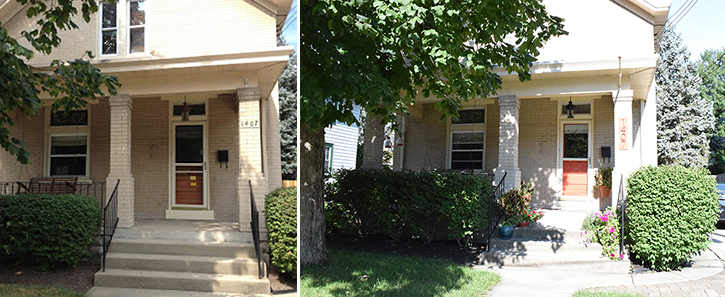

The biggest updates we made to the general exterior of the house are painting the front door, upgrading the address numbers, painting the light black, and getting a new roof. Filling the porch with potted flowers is one of my favorite things to do in the Summer. I can't get enough of how their color just spills down the steps. Unfortunately this year one of our big terracotta pots took a tumble, oh well, it's almost time for mums anyway.
Once you enter through the threshold, you'll find yourself in our charming little foyer.

What was once dark and muddy is now bursting with color and personality! We painted the walls, trim, added a landing spot for keys and such, and even installed a funky yellow light.
Moving through to the kitchen, we painted over yet another shade of brown and breathed fresh new life into the cabinets.


The order of transformation for the kitchen went as follows; painting the cabinets, painting the walls, hanging some DIY curtains, and giving the fan a mini upgrade. We also swapped the microwave stand for some metal Ikea shelves, and glammed up the mini awkward bathroom. Future plans still include new appliances, cabinet hardware, and replacing the floors.
Off of the kitchen is our dining room.


This was one of the first rooms that really felt "complete". Of course, nothing is truly finished, and although we hardly ever actually dine in here it's still one of my favorite spaces. Because it gets the most sunlight, a majority of the plant babies live in here. Painting the ceiling had a major impact on how this room felt, and I love the addition of Eric's guitar and ukulele on the wall. We still want to paint the chairs white (you can see one in the background of the first pic) and reupholster the cushions. I've also been keeping my eye out for a sweet lighting option...but we'll see.
The only room left on the first floor is the living room!


I could NOT paint over that olive green fast enough. And painting all the trim white was one of the best decisions we ever made. Notable things I adore include the big-kid furniture we gifted ourselves one Christmas, Eric's old nesting tables I gave a facelift, that colorful shag rug, and thrifted sconces I scored for practically nothing. That coffee table also wins best purchase for under $90.
Our floor plan is basically a circle, so once you've mozied through the living room you'll find yourself back in the foyer face to face with our gallery wall.


Walking into your home should fill you with all of the feels, and that is how I react every time I come home from work and look at all of our pictures, knickknacks, and random elephants. That gallery wall is a reflection of our life, and watching it grow through these years has been way too much fun.
So let's head upstairs!

Right from day one, I knew I wanted a black and white banister. If you looked closely at the spindles, there was so much brown paint on them you could barely make out the curvature details and the handrail was anything but sexy. They needed some serious love, and we were ready for the job. And OMG what a job it was. The whole project took a lot of time, repetition, and yet again Eric showing off how incredible he is. He also tore off the brown carpet (are we sensing a color theme??) and replaced it with a beautiful geometric grey runner.
One of the reasons we bought this house is because it actually had a full second story. We were shown a lot of "cape cod" style homes where the second floor is one big room with slanted ceilings on both sides. Not so great when your husband is 6'8''.

More brown walls, more brown trim, more brown doors. UUUGGG! PAINT PAINT PAINT!
Oh, and replace the light with a lil something super cute.
To the left, you'll find the master bedroom.


We chose to paint the walls the same grey as the living room, and once the doors and trim were painted white everything really brightened up. The ceiling fan and headboard were recent additions, and our bed frame was build custom by Eric's grandpa. I also created a jewelry organizing out of an old mattress spring frame from a baby crib. Someday I'd like to get a rug, or at least two smaller rugs for each side of the bed, and hang a few more things on the walls. For now, I'm very pleased with the cozy state of our bedroom.
At the end of the hall is our bathroom, or mermaid room as I've dubbed it.


This room was pretty boring (tan, brown, darker brown) but I think the end result is just lovely. I actually did this makeover 98% by myself, so go me!
Turning back down the hallway you'll find our two spare bedrooms. One of which we knew would need to be made for overnight guests.


When deciding how to design this room, I knew I wanted to hide the sloping ceiling. That is why the color only goes halfway up the wall, not only is it bold (which I love) but it serves a legit purpose. Next steps for the guest room include an updated ceiling fan, more storage for guests to put their things, and more art on the walls.
Last but not least we have our office space.


Our office has been the most recent room we've worked on. Again, to hide the sloped ceiling we painted everything white except the one full wall. And I tell you what. That beautiful emerald GIVES ME LIFE! It's almost comparable to the high I get while styling those shelves. Having space to actually work and be productive at home has absolutely been a game changer. Plus sometimes I'm doing freelance, and Eric's working on school stuff, and we're like on a little computer date and IT'S SO CUTE!
Ok, enough pictures from the inside, let's go out back!


Writing this post was an absolute blast. I had forgotten what each space looked like when we first moved in, and the change is incredible! I do find it funny how some areas have been completely revamped, and other little decorations and things haven't moved since I placed them down five years ago.
I feel the winds of change a blowing though. Maybe it's about time we consider crafting up another crazy DIY in the near future. Hmmmm...
Check out all of our home improvements, by visiting the OUR NEST page.


