Hello friends!
We have been in
our new house for just under a month, and so far, we are LOVING it. Harrison
has yet to get bored of running from room to room and pretty much refuses to
walk anywhere.
I think he’s
enjoying the extra space just a bit.
And you KNOW
that Mom is enjoying the extra space. 😊 You guys, we have CLOSETS. Plural. As
in one in each bedroom as well as the hallway and in the basement. We’ve also
gained about twice as much square footage, 2 1/2 more bathrooms, and a GARAGE!
Eeeek! We have never had a garage before. They handed us the remote during the
closing and I could not stop smiling.
I adored our
old house. It was the absolute perfect starter home, and last week when we did
our final walk through to make sure everything was set for the new owners, it
seemed twice as small as what I remembered. Makes me laugh now, considering our
new master bedroom, bath, and closet have a larger footprint than the entire
upstairs. I am beyond grateful for the life we spent there. It kept us humble.
We never needed a lot of space, and we were so so happy in those old walls,
with its creeks and cracks that a building of over 100 years will undoubtedly possess.
Makes being
thankful for what we’ve worked for and been blessed with extremely easy.
Ok, enough
sappy stuff. 😉 Let’s see some pictures!
Now I warn you, this is a raw and authentic house tour. Boxes are everywhere, things are untidy, and that's because...well...we live here. But what a joy it will be to compare these crazy and cluttered BEFORE pics to the amazing and styled AFTERS! Won't that be fun?! Let's dive in! 
Our new
neighborhood is one of the more developed in the area, the trees are large, the
houses are similar but not in a creepy Stepford Wives way, and there are
sidewalks leading to quiet caul-de-sacs in every direction. That was a big
thing for me. We take tons of walks, so being able to do that safely was high
on my priority list.
Starting in the
garage, everything is kind of a hot mess. Ironically, even though we finally
don’t have to park outside anymore, we’ve been doing just that. Until this week
that is! While I was away on a work trip, Eric called and said the CRV finally
fits! Woohoo! And even though this is “Eric’s territory” I’ve kind of been
sucked into garage organization methods via Pinterest. I’m obsessed. We’re
going to utilize ALL of the shelves.
Heading towards
the front entrance we have our porch! A bonus feature that I was super stoked
about. One of those “not a necessity…but would be awesome to have” type of
things. I’m picturing cutting the bushes down slightly so it’s not so hidden
and adding some adorable chairs to chill out on, maybe even another swing.
After you step into the house, you’ll find yourself in our foyer, the hallway
will lead you straight into the kitchen while the stairs will bring
you…well…upstairs.
Directly to
your left is the playroom. I believe it was originally designed as a formal
living area, which we don’t really need, so for the time being it’s serving as
a catch-all for the boxes of décor as well as Harrison’s toys. It’s nice to
have somewhere to store his things besides the living room and
keeps them (more or less) out of the way.
Through the
playroom is the dining room. I’m still not sure where I want our china cabinet
to stand, so nothing has really been done in here except pile the boxes up high
so everything fragile is out of the Harrison zone.
I would love to
swap out the light feature for something funkier (that goes for every light in
the whole house actually) and maybe try a dark and moody color for the walls.
From the dining
room, you have our kitchen which is also open to the living room. I'm seeing white upper cabinets, deep teal lowers, and beautiful gold hardware. Just you wait!
Peaking through those sliding doors to the outside, you can see another reason why Eric and I fell in love with this house. For a planned neighborhood, the backyard is HUGE!
Looking at it from an aerial view, I think it's one of the largest properties in the entire development. It just keeps going. Behind the treeline is a field, so there's a sense of "country living" while still being extremely close to everything we would need. Already we both have visions of gardens, another pergola, and of course a swing set for the kiddos. I'd also love to fence off the left portion as well as plant some fur trees for greenery and additional privacy.
Back inside, off of the living room, is the mudroom! This of course would lead you directly into the garage and is another amazing bonus I was tickled to discover. I have always wanted some sort of landing pad to drop your things before heading into the house. My dream is to have cubbies or cabinets, to keep shoes, coats, cleaning supplies, whatever!
Backing up slightly, another door off of the living room/kitchen space leads you down to our FINISHED basement! YES! We have made it to the world of a fully functioning 3rd floor! Woop woop!
There are two main spaces in the basement, this large room features a bar and tiled floor area which Eric can use as his "man space", then heading toward the back there is another full bathroom, and a hallway leading to one more room which we're currently using for storage.
There are two decently sized closets back here, and Eric has already drawn up plans to build shelves so we can use their vertical space to the fullest.
So that pretty much wraps up the main floor and lower level, so let's head upstairs! I'm currently debating if I want to recreate our gallery wall...or keep it simple since overall this staircase isn't as open compared to our last.
When you reach the top you'll find all four bedrooms, a bathroom, linen closet, and laundry room! You read that right, the laundry room is UPSTAIRS. As in where all the clothes are. As in I no longer will be hauling baskets up and down flights of stairs.
We can't actually utilize the laundry room yet because the previous owners took their washer and dryer, but below is a peek into this glorious ("glorious" based on it's potential...not actual appearance) space as well as the kid's bathroom which is the next room down the hallway.
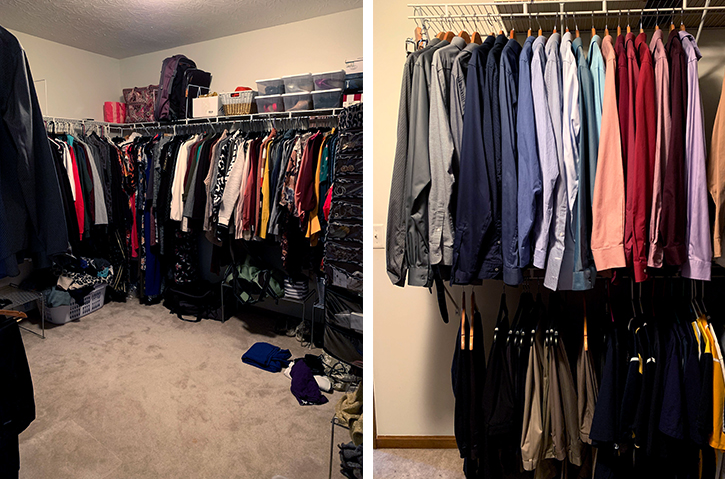
Directly behind where the previous hallway pic was taken (or immediately to your right once you've reached the 2nd floor) is our master suite. This puppy is WAY more space than we'll ever need. I truly feel spoiled every time I set foot in it. Not only do we have a large area for our bed, but the bathroom is also a great size, we have our own little linen closet, and our walk-in closet is almost equivalent to Harrison's old nursery.
Told you these are raw, our bedroom was a disaster when I snapped that pic. The only areas I feel 90% organized with are our bathroom, linen closet, and walk-in. I Home Edited the crap out of those spaces. We're talking categories, bins, labels, stations, dividers, the whole works. Eric even took notice and arranged his dress shirts in rainbow order. SO PROUD!
The remaining rooms upstairs include the office/guest bedroom, future nursery to a little lady coming in February, and of course Harrison's room.
I'm still not sure of the vibe I want for either of the kid's rooms. Harrison is super into trucks, cars, and really anything with a motor. But I don't want this to end up looking like a cliche man cave or dude garage. For the baby, I'm leaning towards mermaids, ocean waves, and bungalow beachiness.
Well, that pretty much wraps up the entire house! Thank you so much for giving me the space to share our home with you, and I can't wait to dive into the redesign. I've already begun hanging pictures everywhere, and Eric is tackling the idea of built-ins around the living room fireplace. Both of us have so many ideas we have to check-in every now and then to the reality it won't get done overnight. Ha! A girl can dream though.
Check out all of our home improvements, by visiting the OUR NEST page.