Showing posts with label build. Show all posts

Wednesday, August 23, 2017

It's Finally Finished! Our Backyard REVEAL!

I don't even know how to start. 

Since 2013 Eric and I have been planning, dreaming, hoping, and working our butts off to create the perfect backyard oasis. During the very first walk through of the house, we knew it had to be ours the moment we stepped outside. Since there wasn't a garage, the "man cave" and spacious fenced-in yard was definitely the selling point. There was SO MUCH potential we could practically touch it. 


Fortunate for us, the previous owners of the house ran a landscaping business. We already had a great foundation of trees, shrubbery, and perennials, as well as a little fire pit area set with pavers.


Let's recall the status of our backyard upon move-in-day. 

Overall, not too shabby, the grass though needed some serious TLC. Along with said landscaping gig, the owners also had a few dogs....who obviously enjoyed marking their territory ALL over the backyard. So what do we do? Scrap the whole thing and start again! One weekend + manpower + a LOT of tilling/reseeding/watering = a gorgeously luscious new lawn.
SO. MUCH. BETTER! For the record, we completely appreciate how blessed we are to have such a large backyard. Especially one that's fenced in, and also sporting a killer party-room. But like I mentioned before, we KNEW there could be more, we just had to make it happen.

To recap, let's start from the beginning. I briefly shared the original plan and an inspiration mood-board in this post, breaking down our 2015 Summer To-Do list. Fast forward to August of that same year, and we broke ground on the pergola! Pause for effect...because we didn't really do anything again until this July, when our concrete got poured and the flower beds built. And last but certainly not least, the most recent (and most fabulous) project is of course our DIY table. 


So now that you're all caught up, without further ado, I bring you THE BACKYARD REVEAL! 

The shelter off to the side was straight out of Eric's imagination. He wanted somewhere to store the grill and electric smoker, that would keep them sheltered, but also be easily accessible. A few sheets of graph paper later and the "Grill Hut" was born. 
The floor of the hut is made out of the same pavers that Eric tore up when he framed the patio out. He salvaged and organized them to easily recreate the circular pattern again. In the original backyard, that section would have been perfect for a fire pit, of course now our fire pit area looks WAY cooler.
Tiki torches, fluffy pillows, and that bench converts into a side table! Even though we've yet to light it, I already have s'more ingredients in the pantry for the first fire of the season. 

Hanging above are the cafe lights. We used extra pieces of lumber supported by flower pots to bring the light over the whole side. 
Shopping for accessories and decorations was one of my favorite parts. I couldn't get enough of the pillows, flower pots, plants, and funky things to scatter about. One night when Eric was gone, I drank wine, watched "Madam Secretary", and DIY'd that macrame plant hanger. Woop woop Pinterest! 
Speaking of accessories, Eric's favorite has got to be the sound system. He rigged it up so everything is controlled inside the Man Cave, and played outside via two hanging speakers, and one buried in the flower bed. 
Each of them was a Craigslist find, and (in my opinion) sound absolutely awesome.

Moving around the side, here is where we're hoping the clematis plants take off, and eventually cover the lattice with vines and flowers. Each time we sit outside to eat, you can tell they're slowly growing, making their way higher and higher. 
And that brings us to the end of the tour, the end of a crazy-long blog post, but definitely NOT the end of the party! We're just getting started and can't wait to chill in our little piece of paradise with anyone and everyone! 

This backyard has been a LONG work in progress, built on love, and meant to be shared with the people we love.  :)  So come on over! I've got s'mores and a bottle of wine all ready to go. 


Check out all of our home improvements, by visiting the OUR NEST page.


Tuesday, August 8, 2017

The Prettiest Table That You Ever Did See

At this very moment, I am typing my little heart out, while sitting outside under our COMPLETED PERGOLA! I have been wanting to do this ALL SUMMER and it's actually happening! Who knows how long I'll last before the mosquitos go insane, and I retreat once again to the living room. But until then, I'm going to enjoy the hell out of it.

Every blogger's backyard oasis needs a sturdy foundation to prop their computer. Or more practically speaking, every normal person who wants to eat outside needs a place to set their plate! So of course while planning our paradise, we searched high and low for the perfect table. While nothing on sale struck our fancy, Eric did find this tutorial on how to build one himself. It seemed easy enough (according to him), and even had built-in drink coolers stored down the center you could fill with ice! 

Per his create-something-out-of-nothing M.O., I came home one day after work and THIS was sitting behind the house. 
Table? Check. Now how to finish it??? 
Call me crazy, but right from the moment I saw it I knew this table needed to be two-toned. Dark wood on top, crisp white contrast on bottom. To figure out the stain, I mocked up a few different versions with Photoshop. In the end, I decided going with something similar to the pergola stain would look the best with the teal and black furniture we had already picked out. 
Another idea that hit me was to paint a little something going right down the middle. A faux table-runner if you will. Since I already drew a pattern on our mini-awkward-bathroom wall (which I consider a fabulous success) the decision to take that same design to this project was a simple one.

The pattern is broken down into 4 basic stages; big flowers, vines, small leaves, and dots. 
Eric wanted the paint to have plenty of time to dry overnight, so he could start applying the protective varnish right away in the morning. This meant I had ONE EVENING to start and finish the entire table. Good thing he brought me a Diet Coke and bug spray.

This is probably one of the best examples of how Eric and I's DIY relationship works. We plan it, he builds it, and I swoop in to make it pretty.
The two teal chairs are originally from Target, but we snagged them for a fraction of the price on an auction site called Fast Track It. The four matching black chairs were a lucky find on Craigslist, and the candles came from Mendards. 
I'm not sure how many layers of varnish Eric ended up using, but luckily it didn't discolor the white paint at all. We plan to cover it, along with the rest of our furniture, as much as possible to protect from the elements, but the varnish will keep unwanted water rings and scratches at bay. 

The final product is literally EXACTLY how I envisioned, and hands down one of the COOLEST before and afters our little nest has ever seen. Well...until I get to talking about our backyard as a whole. Now THAT is a pretty epic transformation, STAY TUNNED! 


Check out all of our home improvements, by visiting the OUR NEST page.


Friday, April 28, 2017

Let's Put a Pin in That...Why I Never Throw Anything Away

Ever have a thought enter your brain, and no matter how much time passes, just refuse to let it go? I've personally lost track how often this has happened. I can't help it! I've got millions of plans, and thousands of ideas. When inspiration strikes, I'm overcome with this crazy urge, and have to do everything within my power to bring it to life! 

Pin all the pictures! 
Make all the lists! 
Organize all the supplies! 

Occasionally the idea dies, and that random thrift store purchase gets tossed, because reupholstering an entire chair turns out to be WAY harder than it looks. But for the most part, I'll eventually circle back to the idea, and my hoarding tendency comes in REAL handy. When I find myself rummaging around for that certain SOMETHING, I've usually got it stored away from that one time...I thought about doing that one thing...with that other thing.

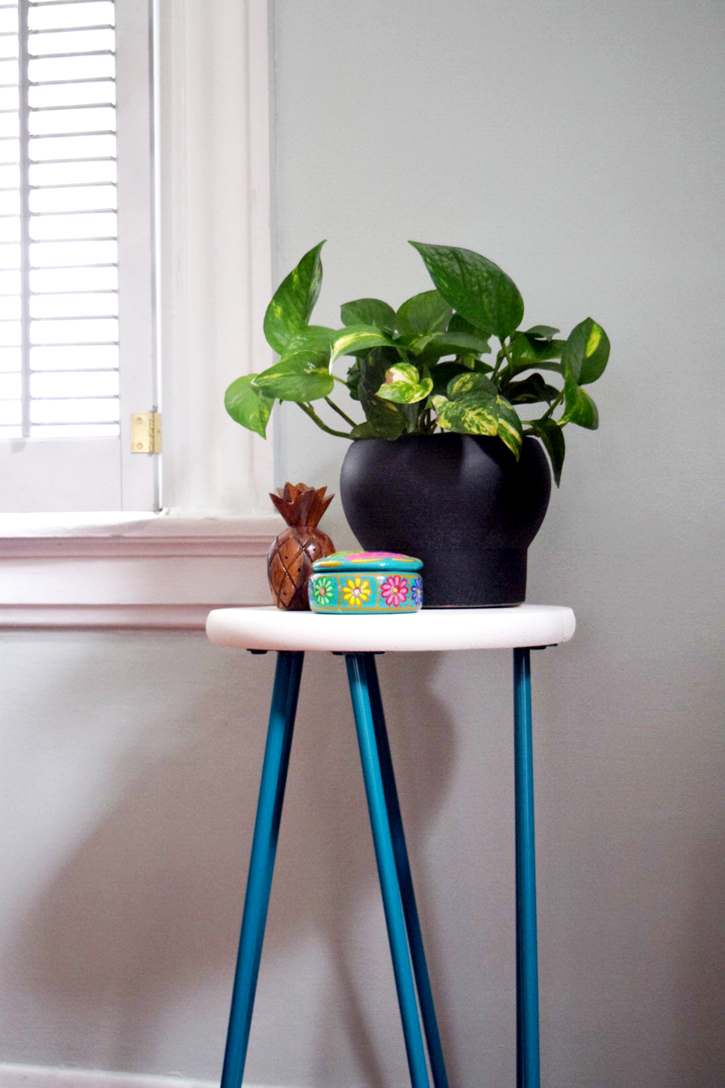
Example A: Teal Hairpin Legs circa 2014. So here's the back story. While trolling Craigslist, I spotted this super basic desk for $20. My random-project-idea at the time was to find a side table for our entryway, and when I saw those legs, I figured I could build it. Weeeeelll I ended up just buying one from At Home, and sadly those legs never saw the light of day. 
But I didn't give up! Every time I went downstairs, saw them propped up in the corner just begging to be used, the creative cogs would start turning. So recently when my heart screamed "YOU NEED A PLANT STAND!", my brain calmly responded "Shhhhhh remember that desk you bought off CL three years ago?".
YES! I hustled over to Menards for a round wooden panel as the top, slapped on some white paint we had a sample of, and used the hardware already included with the desk to secure all the legs. A couple episodes of "Scandal" later, I had myself a plant stand! 
Isn't he the CUTEST?!! 

The downside is I only used three of the four, so now a single leftover leg is lying around. But what have we learned? DO NOT THROW AWAY THE THINGS! Just put a pin in it, you never know when you'll need it again.  :) 

Check out more craft projects, by visiting the GETTING CRAFTY page!